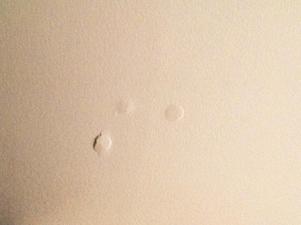
Popping Nails – Causes and Rectification
Popping nails can be identified by imperfections to the paint on a wall as seen in the picture. This blog explains the causes, rectification and possible problems relating to popping nails.
|
Causes
Popping nails are normally the result of:
|

|
Rectification
- Tools and materials: Filling blade/paint scraper, 1 – dry wall screw, 1 – dry wall nail, drywall compound/flexible filler, nail punch, screwdriver/cordless drill, hammer, miniature paint roller, primer/sealer, matching paint and 100 grit sandpaper.
- Resecure the loosened plasterboard to the timber frame: Ensure you locate the joist/stud that the original nail was fixed to, take your dry wall screw and drive it through the plasterboard and into the underlying timber support approximately 25mm from the popped nail. The new screw should not puncture the paper backing on the face of the plasterboard, a countersunk of around 2mm is advisable.
- Drive a new nail immediately adjacent to the popped nail: Rather than trying to remove the popped nail entirely which can often cause more damage to the surface, drive a new nail in immediately adjacent so that the head of the new nail overlaps that of the popped nail resulting in the popped nail being driven back to its original position. Take your nail punch and counter sink the new nail, and subsequently the popping nail, around 2mm into the plasterboard.
- Apply dry wall compound or a flexible filler to the holes created by the new screw and nail: use your filling blade/paint scraper at a 45° angle to fill the holes then revert to a 90° angle to remove excess filler. Let the compound/filler dry completely.
- Sand the patches: Lightly sand the patches using a fine, (around 100 grit), sandpaper.
- Apply a second coat of compound: Use your filling blade/paint scraper to apply a second coat of compound/filler. This coat should remain thin. A maximum of around 2mm in the centre, and extend out slightly beyond the two holes feathering away to flush with the plasterboard surface. Do not worry if it does not look too neat as once it is completely dry you will again use your fine sandpaper to carefully sand the whole area leaving only a very thin covering of the dried compound almost flush with the plasterboard surface.
- Painting: Use a primer/sealer initially over the patched area. Allow to dry before applying a coat of matching touch up paint using a miniature paint roller and feathering the paint out from around the patched area.
Possible Problems
- The original paint has weathered/faded and the new paint will not blend in.
- Some darker paints are notoriously difficult to successfully patch.
In both of these instances you will need to re-coat the whole of the affected wall/ceiling.
Please also note that where moisture intrusion has caused the timber to swell and contract resulting in nails popping, the timber should be allowed to fully dry prior to rectification.
At Cap-It-All Building Inspections Perth we find evidence of nails popping during many of the Building Inspections we undertake. Contact us now to book a Pre-Purchase Building and Timber Pest Inspection.
